Pages

Friday, July 25, 2014

Carrot Cake: The Art of Trial and Error

My latest cake project was a little less about the decorations and a little more about the actual baking. I had decided to make a carrot cake for a birthday present (since it was this person's favorite kind of cake). As I had never made carrot cake before, I thought I should focus a little more on getting the recipe right because no matter how pretty a cake looks, if it doesn't taste good it's sort of a waste.

The first thing I did was just browse Pinterest for some recipe options. I found a few that sounded good, and one in particular, from Taste of Home, which I've gotten recipes from in the past and have been impressed. The reason this one stood out to me was because it called for brown sugar instead of white sugar, which I thought would create a well-suited flavor for a carrot cake because of the spices in the cake that tend to pair well with brown sugar.

Unfortunately, I can't lie, it didn't turn out too well. However, there were some other factors that could've affected the outcome besides the recipe. When I tasted the cake shortly after it cooled, it was pretty dense, which I expected because brown sugar crystals are more packed than white sugar crystals and therefore don't create as much of a "fluffy" cake. But it was not too dense and the flavor was great.

Anyhow, I was a little pressed for time and was not able to frost the cake that same night, so I tried to cover it the best that I could, but it was late and in my haste to get to bed I did not take into account that some of the bottom half was not completely sealed. I had the cake on some paper towels on top of a cooling rack, but what I forgot was the fact that the paper towels didn't quite cover the whole underneath side of the cake. So, even though I covered the top and sides of the cake with plastic wrap, there was a little bit of the bottom of the cake that was exposed.

In any case, when I tasted it the next day I decided it seemed too dry, and I'm a perfectionist when it comes to things I'm passionate about, so I just could NOT serve it. So I went back to the other recipes I had found, and decided to go with the one from Grocery Budget 101, because it used white sugar instead and even though the brown sugar may not have played a part in the way cake turned out, I didn't want to take any chances.

This one turned out delicious! It was moist yet fluffy, and lots of flavor. The only thing I did differently with this recipe was add a little nutmeg and ginger, because I love how those spices combine with cinnamon and I think they add a little something extra to the aroma of the cake too. I also added a little orange juice to the frosting, which I had thought of because it was one of the frosting ingredients from that previous recipe on Taste of Home. It just seemed like a hint of orange would be a pleasant complement to the carrot cake flavors.

Now of course I did have to add at least some decorations to it, because I like the look of decorated cakes and I wanted the extra practice. I will say that the crushed nuts and sprinkles on the sides of the cake were a bit of an annoyance because of the gigantic mess it made, but at least it looked cool. ;)


Buttercream carrot on top of carrot cake

In the end I definitely liked the way it turned out. Even my boyfriend said it was delicious, and he really isn't a big fan of carrot cake because of the cream cheese frosting. That being said, I think next time I'd like to try half white sugar, half brown sugar, and see how that works, just to try to incorporate some of that rich brown sugar flavor.

Finished carrot cake
Recipes for baked goods are usually pretty finicky, but you can't be afraid to test the waters a bit, and put your own spin on them. Especially if you know a little bit about what each of the ingredients does and the affects they have on the finished product. There's nothing wrong with a little trial and error. Even if something doesn't work out, at least you know for next time. :)

Friday, July 11, 2014

Anniversary Cake: Pearls and Rosettes

I've been browsing some more cake decorating tutorials, from Global Sugar Art and Wilton. This of course made me want to make another cake. Luckily my parents anniversary was just around the corner so I thought it would make a nice present for them.

Note: The video from Global Sugar Art on Buttercream Basics: Making a Cake, has some great tips that make a really big difference on the texture and flavor of cakes.

I really enjoyed the chocolate flavor of the last cupcakes I made, so that made me want to try making a chocolate cake. I also love how well the chocolate flavor pairs with the vanilla buttercream frosting.

Thus far I have made a fair amount of cupcakes with the rosettes on top, but none on a cake, and I just love how cool they look on a cake. Additionally, given how pretty they are, I thought they would be a nice decoration on an anniversary cake.

I really like the look of a cake that has different shades of the same color, which I hadn't tried before.
I opted to go with different shades of blue, because it's one of my favorite colors, and I knew it would be a nice complement to the chocolate color of the cake (which you could see when you cut into the cake).

The cake came out very nicely done, with amazing flavor, just like the chocolate cupcakes had. One thing I will say though is that because this was an extremely moist cake, it also wasn't super strong, so I'm not sure how well it would've held up with more than just the two layers or with heavy fondant decorations. I may need to alter the recipe if I ever need to accommodate those situations.

This was the first time I used all shortening in my buttercream frosting. I did add some butter flavored extract to it though, and it tasted fantastic! However, I may have used just a bit too much powdered sugar because the frosting was looking a little dry when I was piping the rosettes.

I won't lie, making the rosettes on a cake was a little harder than on a cupcake, because you have to try to make them all the same size and it's not like you can use the edges of the cake as a guide the way you do for a cupcake. I think it'll get easier the more I do it though.

I had just bought those blue pearl candies that morning at the grocery store when I went to buy more shortening. They're actually Sixlets, and they were in the decorating section at Target (in the baking isle near the shortening, hence why I saw them). They were the perfect color and I thought they would fit in really well with the rosettes.

After I saw how the pearl candies looked on the cake, that's actually what made me decide to make the white buttercream beads to complement that look on the sides of the cake.

The border around the bottom is a simple shell border, which I've don't before, but this time I used a much larger star tip (1M, the same as the one for rosettes). I like the way that turned out, and I didn't think it was too much of a distraction from the rosettes which were the focal point.

My parents (and everyone else who got to try a piece) loved it, they all had multiple slices! Even my mom, who doesn't eat a whole lot of dessert, said it was delicious. I think that's a sign of success! :)


Anniversary cake, with rosettes and pearls

Monday, July 7, 2014

Sweet Edible Nature: Fondant Fruit and Frosting Flowers


For my latest cake decorating creation, I opted to make cupcakes, since it had been a while. I also wanted to make multiple flavors and decorations, something I've always loved about cupcakes. I think that's one of the reasons they're so popular; they can be easily catered to many different individuals.

I ended up settling on a little bit of a nature theme, since the person I was making these cupcakes for likes a lot of things in nature. I chose to make the cupcakes ahead of time in order to space things out a bit so that I wasn't trying to do everything in one day. It helped a lot!

Half of the cupcakes were vanilla, the other half were chocolate. I got both recipes from Pinterest (of course). The vanilla one was from a blog post called The Ultimate Cupcake Guide, in which the author tests different versions of the same recipe (changing only one variable each time) to see what makes the best cupcake. She seemed to really like the one in which she added an extra egg yolk to the recipe, so that's the one I went with. It was good; very flavorful and not overly sweet. However, the texture was a little dense for my taste. I think I will try the traditional recipe next time.

The chocolate recipe was from a blog post called A case of the horrible, no good cupcake day. I was a little nervous about them though, because when I mixed the batter the consistency was really thin, almost the opposite of the yellow cupcake batter, and I was worried they weren't going to bake right. But I triple checked the recipe and I hadn't made any mistakes so I decided to go with it. They turned out amazing! They were super moist, yet light and fluffy, and the chocolate flavor was rich but not too sweet. I will definitely use this again! They also paired really well with the vanilla frosting :)

A lot of these decorations, especially the flowers, were inspired by ones I had seen on Pinterest and really wanted to try. I don't like to replicate things exactly the way I see them though, just to challenge my own creativity.

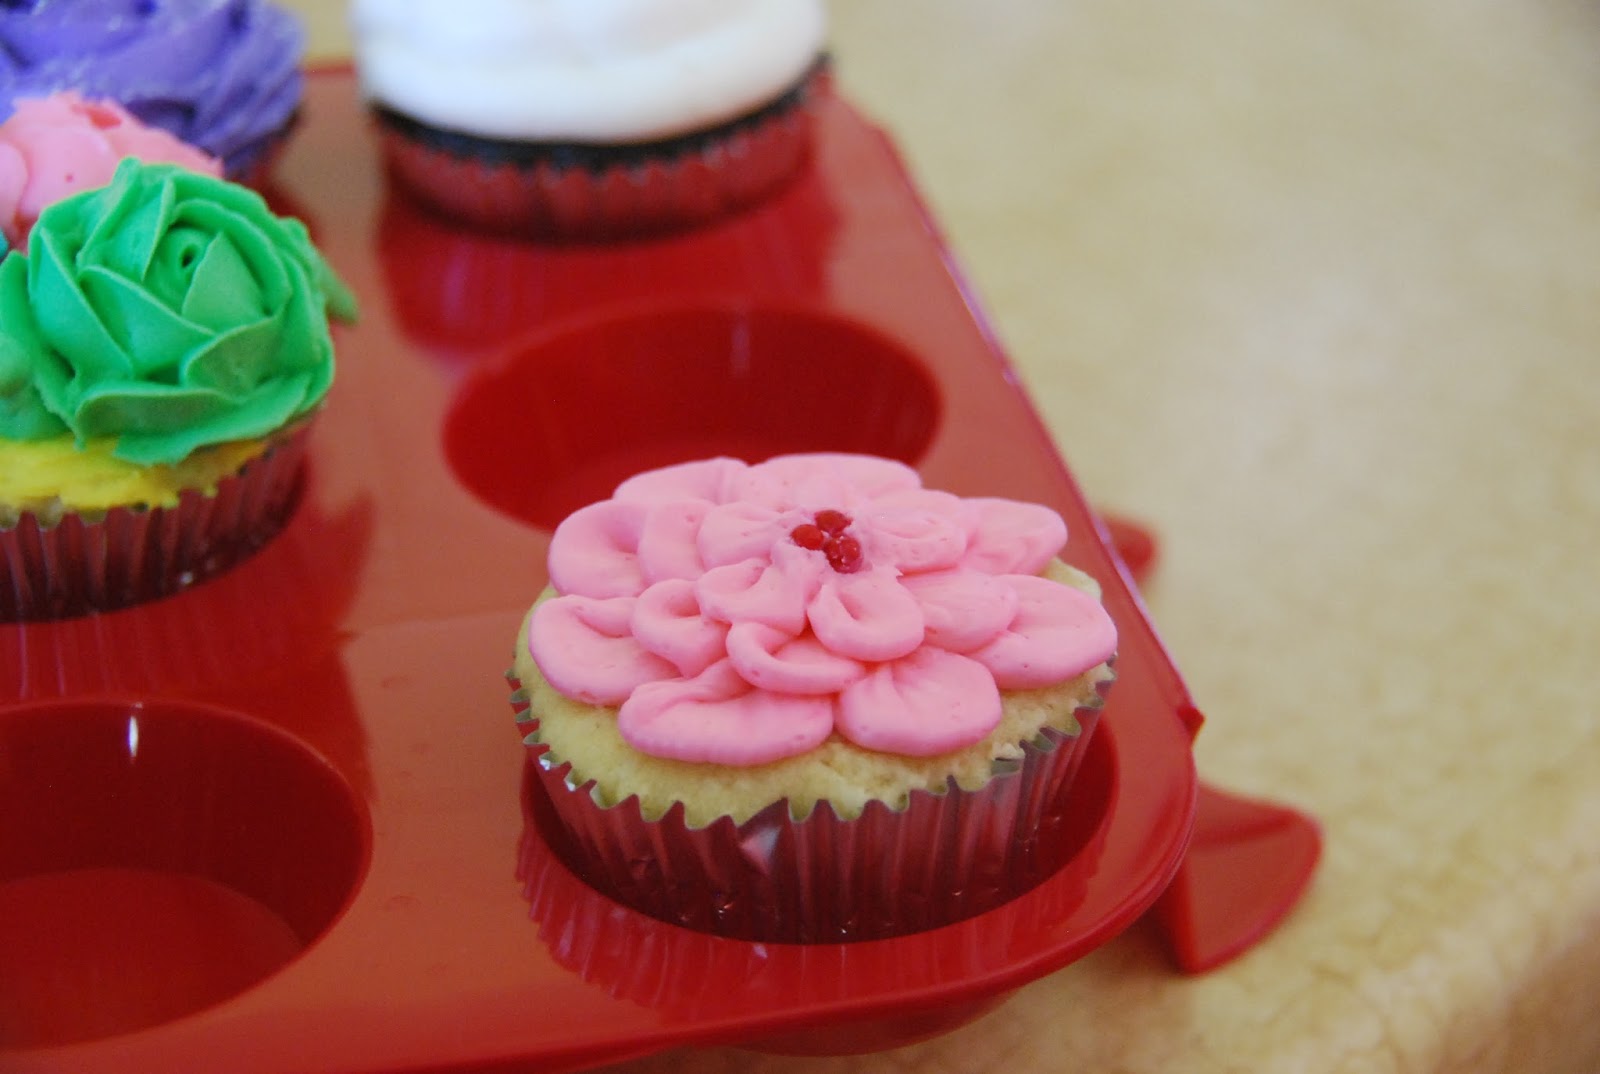
Nature-themed cupcakes


Purple rosette
Blue drop flowers
Small pink rosettes
Pink layered flower
Fondant bluebird with fondant raspberry
The apple one, the cherry one and the pink rose one were my favorite ones to make. The apple cupcake was fun because I knew I was going to have to figure out how to shape the frosting so it looked like an apple, and I really liked texture and appearance from the red glitter and sprinkles. I also filled the center of that one with apple butter, which turned out really well.


Apple cupcake
 The cherry one was a little difficult, because I was trying to make the shape as realistic as possible. I like the way that whole cupcake turned out though. I like the simplicity of the design, and that it still looks visually appealing.


Fondant cherry topped cupcake
 
I like the pink rose one because it was a design that I just threw together, without ever having tried it before. I think it turned out really pretty, and a little old-fashioned, which I like sometimes.


Pink rose with purple border
The one with the little flowers on the grass was actually a little more difficult to make than I anticipated. I think the problem was that I should have changed the consistency of the frosting for that particular frosting tip (Wilton grass tip 233). I had to apply too much pressure in order to get the frosting to come out and therefore wasn't able to hold it as steady. So the pieces of grass are not all the same width from top to bottom. I should have added a little water or milk to thin it out.
 
Pink star flowers on grass.
I think in the future I will do more than one of the same cupcake, versus all different cupcakes. The reason I didn't do that this time is because I was so anxious to try different designs and I need the practice, but there were just too many different tips required, combined with too many different colors. It made for a big hassle and a lot of clean-up! I still had a lot of fun making them though, and it was worth it because I know more about what to do - and what not to do - for next time.

Tuesday, July 1, 2014

Polka Dot Fondant Cake

As much fun as I've been having learning cake decorating techniques on my own, I thought it might be smart to see what options are out there for actual classes. I didn't want to sign up for any in-person classes because I wanted my schedule to remain flexible, and to be honest I like the idea of learning without an audience (other classmates). So I did a Google search for online cake decorating classes, and was able to find quite a few options on this site called Craftsy. Their classes are all within a pretty reasonable price range and they also have a lot of random sales so I love that!

One of the classes I ended up purchasing was called The Wilton Method: Decorating with Fondant. It shows you all the material you are going to need, even before you purchase the class, so you know ahead of time if there are going to be a lot of additional costs. I also have access to the videos and class materials indefinitely, which is awesome in case I ever need to refresh my memory on any of the tutorials.

I didn't have quite all the materials it called for, so I ended up ordering some. Unfortunately it was taking too long for my order to arrive, so I ended up starting the class anyway. I figured if I had at least the essentials, the tutorials and tips would still be beneficial, even if I made a slightly different cake.

So the first thing I did after my cake was baked, is ice it, so the fondant has something to adhere to. Obviously it doesn't matter how pretty the frosting looks in this case because it's going to be covered anyway. I did opt to try my new Wilton cake icing tip though. I had seen it on a video from Global Sugar Art. It basically allows you to frost a cake in bigger sections at one time because it pipes out a large flat line of icing.

Then I rolled out my fondant to the necessary size so it would cover the whole cake (which you can determine very easily by taking measurements). I must say, the whole thing was not as simple as Beth Somers (the instructor) made it seem. Transferring the fondant to the cake was a hassle because a piece of fondant that big gets pretty heavy. I like her suggestion of rolling one end back on the roller and then picking it up, so the fondant is kind of hanging over the roller. That makes it a little easier to carry, but it's still pretty heavy so you have to do it quickly yet carefully at the same time, so that the fondant doesn't stretch out in any particular place.

Once you get it on the cake I think the worst is over. However, smoothing it down is not quite as easy as it looks either. You have to be really patient, going around the cake and smoothing it out at the bottom (since that's where it bunches up) little by little, making sure there are no ruffles or air bubbles between the fondant and the cake. And you can't achieve this by just folding over the ruffles and then trying to smooth them out, so I had to resist the temptation to try this, because it's a natural instinct.

The actual assignment called for covering the cake in all black fondant, and then covering it with little daisy cut-outs. I covered mine in white fondant, because that's what I had on hand and I didn't want to take the time to dye it black (which is a very difficult color to achieve), and I decided to cover it in turquoise polka dots, with some randomly dispersed brown fondant beads in between. I really like how brown and turquoise look together.

Note: It is not a good idea to do ALL of the decorating in one sitting. Take some breaks when you can or you will get really tired, or end up with a headache like I did.

I also learned that attaching pieces of fondant to other fondant is as easy as dabbing it with a little water. I wish I had known this earlier when I was making some of my other designs, like the Minecraft and Mario cupcakes, haha.

It definitely was a long process from start to finish, but I was pretty happy with the way it turned out, especially considering it was my first time covering a cake with fondant.

Polka Dot Fondant Cake

I really wanted to do a fancier border since I had just learned a bunch of new ones, but I decided those borders are probably better suited for a non-fondant covered cake. I also didn't want the frosting to distract from the main focus which was the fondant decorations.

In the end I really enjoyed my first fondant lesson. I had a lot of fun with the first assignment, and putting my own twist on it, and I'm only slightly worse for wear ;) I'm looking forward to the next lesson with fondant, or maybe even starting the Wilton buttercream class that I bought!