
I recently bought another book to add to my cake decorating collection, and I think it's probably THE BEST one I have found so far! It's called The Complete Photo Guide to Cake Decorating. I'm sure you can guess why I find it such a great reference: because of all the pictures! This book does a really good job of breaking things down step by step, and including a picture for each step.
One thing this book also includes, that others I found have not, is tutorials for creating different types of borders for cakes. At this point I've used a lot of the same borders for my cakes so I thought it would be a good idea to learn some more. I had also been watching some video tutorials on YouTube for piping different types of flowers. After all that I really wanted to try practicing those flowers and borders to see if it was really as easy as they made it seem.
I find that it's a bit of a pain to have to color frosting, especially if I'm just practicing. But, I really hate seeing all my work in just a plain white color, so, as my mom would say, I put my big girl panties on and deal with it! ;) However, you'll see that the leaves and violets I was practicing were not green and purple, they were in fact orange. They were the last things I made, and by that time, no, I did not want to make two more colors. Keep in mind I was doing this during a power outage, believe it or not, so that in and of itself made this whole process a little more of a hassle. But that's what happens when you're obsessed with learning cake decorating.
First I made a couple of roses, because they're one of my favorites and I wanted to start with something I know. For one of the roses, I decided to try one of my bigger rose petal tips, just to see what that would look like.
 |
| Pink rose with bigger petal tip (left), rose with regular size tip (right) |
Then I wanted to try some star flowers and drop flowers when I realized I had the wrong tip (I blame the lack of good light on that one). I took advantage of the mistake though, and practiced making a few stars.
 |
| Pink stars |
Then I got the correct tip to make the flowers. So for the star flower, you just hold the bag at a 90 degree angle with the tip touching the surface, apply a little pressure until you get the flower to your desired size and then release. For the drop flower the only difference is you twist your wrist a little bit to give the petals that curved-up appearance. So you start with your knuckles at 9 o'clock and then once you start applying pressure you twist them clockwise, and stop when you reach 12 o'clock. Then to finish each of these flowers, you use a round tip piece, and pipe some frosting in the center.
Note: It's really helpful when making flowers (and other designs) to gently place your non-dominant index finger on the other side of the bag from your dominant hand, to just help guide the bag and keep your hand steady.
 |
| Pink and orange star flowers |
 |
| Pink and orange drop flowers |
I actually practiced those again the next day because I thought they looked so cool. I tried it with blue and green which I really liked.
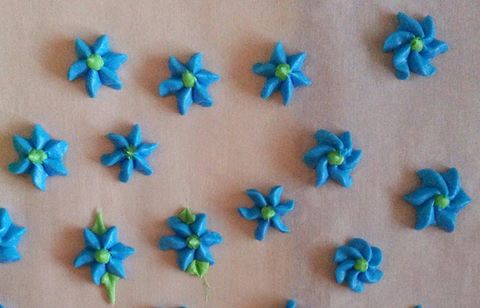 |
| Blue and green star flowers and drop flowers |
After that I decided to try my hand at some more violets, just because they are still the hardest flower I've made so far. It helped being able to make them on the flower nail, because then you can spin the nail, which is a lot easier on your wrist. My biggest problem is trying to get the first petal to be the right size, and then spacing out the rest evenly, because I almost always had barely enough room for the fifth and final petal. However, the more times I did it, the better I got.
 |
| Violet |
For the leaves, I wanted to try to achieve two different types of "looks," from a YouTube video I had watched. One was a leaf with a smooth appearance, the other had a bit more of a ruffled appearance. For the smooth appearance you start with the bag at a 45 degree angle, apply a little bit of pressure, until you get the desired width for the leaf. Then you start easing up on pressure as you pull the bag back, then stop and release. For the ruffled leaf you do the same thing, but as you're pulling the bag back, you just move it up and down slightly to create a bit of a ripple in the frosting.
Note: You might have noticed in the first picture, I went back and added some leaves to one of the roses just to see how they look on a flower.
 |
| Smooth leaves |
 |
| Ruffled leaves |
Stay tuned for my next post and I'll tell you about the different borders I tried!


