Pages

Friday, May 30, 2014

Practice Makes Perfect

As anxious as I am to keep to learn new things, I also know the importance of practicing what I have already learned. So this time I decided to go back to roses, violets and of course some rosettes.

The roses I am getting pretty good at.

White rose
 
One thing I did learn from this round was that it's not a good idea to fill the pastry bag really full. If there's too much frosting in the bag it makes it a lot harder to squeeze it out, especially since you're only using one hand because the other hand is holding the flower nail.

The violets are a lot harder than I anticipated, and I'm still having a little trouble with them. Part of it is also that I'm a perfectionist when it comes to things I'm really passionate about and I want it to look exactly like the pictures on Wilton's website, haha :)

White violet

One thing I think that would help, is to practice them on a cake turntable, so I can turn the table as I'm piping each petal, and not having to try to turn my wrist to achieve the desired shape. Luckily, I have already ordered one from Amazon (360 Degree Revolving Cake Stand) and its arrival is expected any day now! I chose that one because the price was awesome, and it will serve as both a turntable to prepare the cakes, and a nice looking cake stand, so I won't have to transfer the cake to a different stand.

As far as the rosettes go, my plan was at some point to be decorating some cupcakes with them, because I like that look. That being said, I wanted to get some practice piping them onto something with that shape, without having to make cupcakes.

So, it might seem a bit unorthodox, but I decided to pipe them on to the bottom of a cup (similar shape, right?). I'm happy to say it actually worked out quite well. And it was super easy to just wipe the frosting off so I could re-pipe another rosette, without having to dirty too many cups.

Blue rosettes

Blue rosette (top view)

I had recently got some royal blue gel coloring, as I knew I was going to need a darker blue for some of my upcoming decorating ideas, so I decided to try that out for the rosettes. I really like that deep blue color, I think it turned out pretty nice.

These practice sessions are obviously not as exciting as learning something new, especially for someone like me who gets ahead of herself and wants to tackle everything at once. But at least they seem to be helping. :)

Tuesday, May 27, 2014

All Things Fondant

Since I have decided to make a Despicable Me cake for my nephew's birthday this August, I figured it would be smart to practice making more fondant shapes and figures, as fondant will be a large part of that cake.

I was a little disappointed that this batch of marshmallow fondant didn't go quite as smoothly as the first. I have a feeling it was because I made a much larger batch this time. Consequently I now know what the author of the blog post (with the fondant recipe) was talking about when she said the fondant would be VERY sticky. I had to use a lot more Crisco this time. But I did find that the more powdered sugar I added, the less sticky it got.

Note: It helps to make fondant the day before you plan to use it, as it allows the fondant to dry a little and become easier to work with.

The first thing I made was a minion character. There are some good tutorials out there, but this was the best blog post I found for making the outfit: http://cakesdecor.com/entries/17. I hated dying the fondant, as I discovered that the dark shade of blue that's required can stains your finger nails if it gets underneath them. But if it only gets on your skin it actually washes off quite easily, even without soap.

I wish I had made time to make the fondant in advance because the worst part was trying to get it to keep its form, but since it was so fresh it wasn't quite dry enough, so it would sort of sink down and melt.

Candy eyes, which you can get from almost any grocery store or party supply store, work really well for minions. I had used them once before when I made minion characters out of Milano cookies.

I just used chocolate frosting for the goggles, hair, buttons and hands this time since I was more concerned about practicing the body and the outfit for this first time around.

Note: If you buy the pre-made tubes of frosting from Wilton, you can actually use a coupler to attach a frosting tip directly to the tube, so you don't have to put the frosting in a bag.

I think it turned out pretty well considering it was the first one.

Fondant minion.

Then I decided to use the little cut-out shapes I bought at the cake decorating supply store.


I also thought this might be a good time to practice different ways of coloring fondant in order to see the various final outcomes of each type.

So, I compared the different "looks" of fondant with food coloring added directly to it, white fondant with food coloring painted on and white fondant sprayed with Wilton Color Mist.  

Note: Use Wilton Color Mist in a well-ventilated room. Start by spraying the fondant from about 8 inches away, just to get an idea of how heavy the color looks. Then if you need it darker, spray it again until it gets to your desired color. 

White fondant bow sprayed with pink color mist (left), pink colored fondant bow (right).

White fondant star painted with yellow food coloring.

The pearl color mist is meant to give it a bit of a shine/sparkle, and I realized when trying it out that it's best to only spray one layer of color, because too much color can actually hide whatever color the fondant is (unless it's already white).

Pink fondant heart with two layers of pearl color mist (left), pink fondant moon with one layer of pearl color mist.

So one thing's for sure, next time I will make time to make the fondant ahead of time, so it's easier to work with and holds its shape better. I'm hoping that will create a better minion. I also recently purchased a Wilton 10 piece fondant tool set and I have no doubt I'll be able to use that with the minion characters as well. :)

Thursday, May 22, 2014

Cake Toppers and Sprinkles and Fondant, Oh My!

For today I decided to take a break from practicing, and thus had no lesson plan in mind. Yet I did manage to learn something: how to navigate a cake decorating supply shop!

I figured since it's such a pain to have to order supplies and then wait for them go get here, I should at least see if there are any stores nearby. Unfortunately, the closest one was about 25 minutes away, so frequent trips are out of the question, but it beats having to wait almost a week for something to be shipped.

I knew the moment I walked in that door that I had stepped through some sort of portal and into a cake decorator's heaven. They had everything I could ever want to decorate all kinds of confections, and even things I had never seen or heard of.


Here are just a few of the things I found...
  • icing decorations, in everything you can think of (Disney Pixar Cars, and flowers are shown in pictures above)
  • cookie cutters (also can be used as fondant cutters)
  • fondant
  • extracts in every flavor
  • cake pans
  • pie pans
  • candy molds
  • candy melts, in multiple flavors (not just chocolate and white chocolate) which you can use to melt down and make into molded candies or dip other confections, like cake pops, for a candy coating
  • cake toppers
  • candles
  • cake decorating sets, in various brands
  • pretty much every single decorating tip Wilton makes
  • edible glitter
  • food coloring mist
  • sprinkles galore
And all that barely scratches the surface.
 
So, in case you were wondering, this is what $103 worth of cake decorating supplies looks like…


I definitely did not plan to buy a book, but it stood out among the rest. Plus I figured that it couldn't hurt to have at least one book to reference despite the number of online resources there are these days.

Somehow I have a feeling that I could single-handedly keep this store in business.

Monday, May 19, 2014

Finding the Right Rosette


I FINALLY have the tip to make rosettes! So I'm sure you can guess what I chose to learn today.

Now I'm not sure if I'll color the frosting every time I practice, but first of all I was really excited about making the rosettes so I thought they deserved some color. Secondly, I thought it would be a lot easier to to see the entire shape and structure of the rosette if it wasn't plain white.

I had already watched a few videos at this point, so there was nothing left but to just go for it. Note: There are some good videos on YouTube for rosettes, but this was the one I liked best: Rosette Cake (Rose Cake) Tutorial. The first few I made were a little more oval shaped than round.

The first set of rosettes; more oval shaped than round


I kept that in mind and tried to move the tip out a little wider from my starting point. Unfortunately, in the next one I made, I went a little too far over a there was a bit of space in the center, which you don't want. So for a while I was trying to find a balance between the two.

Second set of rosettes; trying to find a balance of space


 Finally, I was able to find the right motion to create a pretty even circle with no empty space in the center.
The "Goldilocks" rosette, with no empty space and an even circle

I will say that because these rosettes are so big, and it takes a lot of frosting to just make one, I ended up having to refill the bag a few times. I had just enough frosting left in the bag at the end to try a few stars (as you can see in one of the above pictures), which is another design you can make with that tip (the 1M). I liked the stars too, but not as much as the rosettes. I'm excited to get the chance to practice them again; maybe next time on an actual cake!


Sunday, May 18, 2014

Fabulous Fondant and a Frosting Faux Pas

I've been seeing a lot of cake designs with rosettes lately, and I've been dying to try making some! Sadly, I don't yet have any of the right decorating tips, so instead I decided to try it using a similar tip that I already have.

I figured that since I plan to be practicing so many designs with frosting that I don't want to have to make my own frosting every time. So on my lunch break today I stopped at Target and picked up some frosting. I knew wasn't quite the same as real decorator frosting, but since I was able to make it work well enough the first time I started practicing roses for my niece's cake, I assumed the same would hold true for this time.

As it turns out, I was very very wrong. That type of frosting just doesn't have the same consistency as decorator frosting, which has a lot more shortening and doesn't melt as easily, unlike this stuff that just could NOT hold its shape. I didn't get any pictures of it, but believe me it was pretty much a disaster. Suffice it to say that the designs looked nothing like the ones on Wilton's website. It was then and there that I decided I would only buy the decorator frosting (which Wilton makes and you can order online or pick up from your local Party City store), AND that I would buy it in the big tubs so that I would never again have to worry about running out of it and having to use regular frosting.

I really didn't want to end the night on such a disappointing note. So despite only having about 40 minutes before my usual bedtime, I elected to attempt some marshmallow fondant. I quartered the recipe, which made me a little hesitant because that doesn't always work out well, but I knew that I didn't have a whole lot of time and if it didn't turn out well I didn't want to have wasted all those ingredients.

I'm happy to say that my luck changed, and the fondant turned out beautifully. I was a little nervous because the blog in which I found the recipe (DIY Marshmallow Fondant) suggested using A LOT of Crisco because the stuff gets really sticky. However, I found that I only needed a little bit on my hands, and it worked just fine to put it on parchment paper instead of having to cover the table with Crisco. Since it turned out so nicely, I then chose to try my luck at adding a little food coloring. It took a little bit of kneading but the color eventually blended in perfectly.

Then I rolled it out with my rolling pin and cut out a star with on of my cookie cutters. It was quite pretty. However, it did NOT taste as good as it looked. It may have been because the powdered sugar that I used was not fresh, which I do know affects the taste of frosting, and the same might be true for fondant. So I do plan to buy some more fresh powdered sugar, just to test that theory, because from what I've heard people will actually eat marshmallow fondant versus regular fondant since it tastes a lot better.

Fondant star


Then I decided to cover something with the fondant, just to see how difficult that might be, because I obviously plan to cover some cakes with it in the future. Of course I didn't have a cake at the time, so I improvised and covered a cup instead (similar shape, right?). It worked quite well; the edges/bunched up parts of the fondant smoothed down really easily, and I was able to cut the extra stuff off the bottom with just a butter knife.

Fondant covered cup


So in the end I was a little sad that the lack of the right kind of frosting prevented me from being able to practice more with the decorating tips, but I was thoroughly excited that the fondant turned out so well. That's something I've wanted to do for a long time, and I can't wait to keep trying more designs with it.


Friday, May 16, 2014

Baking the Road Less Traveled

Hello fellow bakers and sweet treat lovers! I have recently decided to try to master the delicious art of sugary confections. Yes, I want to be a professional cake decorator.

All my life I have been obsessed with desserts, especially anything with frosting! I also have a great appreciation for art and design. So it hardly seems surprising that many a cake have left me feeling intrigued and awe-inspired. To learn how to create those amazing masterpieces has been a desire of mine for quite some time now. I won't get into too much of my background right now, but if you want to know a little more about me and why this is something I want to do, just click on my "About Me" link.

So as of now, I have already decorated one cake using professional tools. In fact, it was that cake that really pushed me to realize that this was something I truly enjoy, despite the amount of work it takes. It was for my niece's first birthday. I decided that since I had made something special for my nephew for his last birthday, I wanted to do the same for my niece, who have both brought so much joy to my life. Side note: being an aunt is one of the most wonderful blessings I have ever gotten. It is so much fun to see life through a child's eyes.

Violet's princess cake


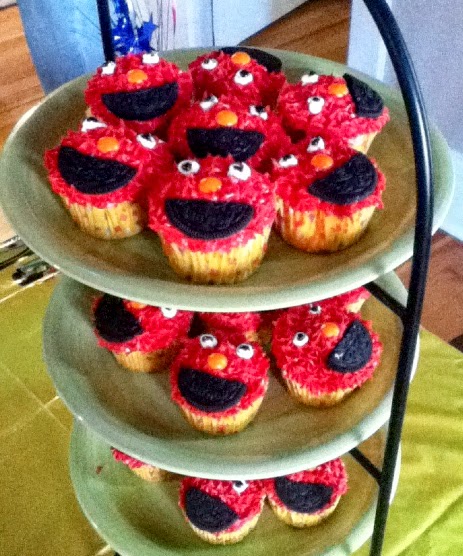
Wyatt's Elmo cupcakes

The inspiration for both of those creations came from a lot of pictures I found on Pinterest (surprise surprise, right?). So for this project I opted to start by doing some more searching on Pinterest, and some other sites, to see what designs really caught my eye. In doing so I also decided that I will have to first play around with some classic cake decorations, using basic tools.

Right now I have 6 different decorating tips, and plan to accumulate more as I continue to learn more designs. I have already learned how to make a rose, as you can see in the picture above of the cake I made for my niece. That one was actually a lot of fun to learn, because it's been a very common flower on so many cakes I've seen and I always thought that it looks so pretty and even life-like.

The biggest help I found with that design was actually by searching for YouTube videos. There are a lot of good tips out there from experienced decorators who have added in some steps/hints of their own to help you be more successful. Here's a link to one of the videos I found most beneficial: How to Make A Buttercream Rose.

My next step is going to be making a plan for what I need/want to learn. For now I am still waiting on some more decorating tips that I purchased to arrive in the mail. So for my next lesson I have decided to start by playing around with some of the tips I have, and practicing the typical designs that they are used for. Then, if I have time, to make some marshmallow fondant. Fondant is something I have yet to make but have wanted to for a long time because it really gives you a lot more options for creating whatever design you have in mind. I also hope to get good enough at making different shapes out of it, as I anticipate using it to make little minions for the Despicable Me cake I'm planning to make my nephew this year. :)